Create Surreal Human Face with Flame Hair and Disintegration Effect in Photoshop
This is an intermediate tutorial so some steps can be tricky - it you are having difficulty with it, just post your comments and I'll be there to solve your problem.
This tutorial can create great effects for use on printed flyers, brochures and other marketing literatures.
Here is a preview of the final effect I have for this tutorial: (Click to Enlarge)...
So lets get Started.....
STEP 1
Create a new document sized 770 px * 1100 px with black background, load the model image into Photoshop cut out the face portion with Lasso Tool:
Paste the selection onto our canvas, position it to the centre and erase the edge with a soft eraser:
Now we can tidy up the image a bit - although it's not really necessary to do those for the final effect, but it gives you a chance to have a go with a number of retouching tools in photoshop :)
Firstly try removing the dark spots with the "Spot Healing Brush Tool":
Then use Smudge Tool to with around 2%-5% strength to smooth out the skin:
Sharpen the eyes with the Sharpen Tool - set strength to around 30%:
and you will have the following effect:
STEP 2
Add the following adjustment layers to this face layer:
Black and White
Levels
Mask on the levels adjustment layer:
and you will have the following effects: (as you can see, I left the right side of the face lighter than the left)
Add some cloud behind the face for some mysterious effect :
Duplicate this cloud layer once and compress it down - this will form the ground texture :
Use a soft black brush to paint some shadow on the ground:
and you will have the following effect:
STEP 3
We can now add the plaster texture onto the image. Firstly load the selection of the face layer, drag the selection onto the plaster texture:
Copy and paste the selection onto the face, change the blending mode to "overlay", erase the left eye and hair portion of the texture with a soft eraser:
Add the following two adjustment layers to this texture as clipping mask:
Black and White
Levels
and you will have the following effect :
STEP 4
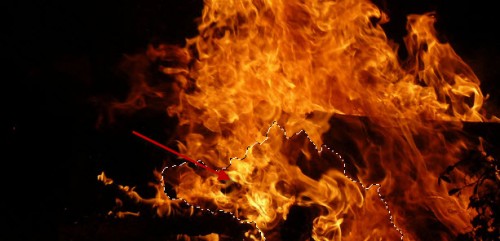
Now we can work on the flame portion of the image. Load the flame stock into Photoshop and use a 20-30 px feathered Lasso Tool to selection the following portion:
Copy and paste the selection onto our image, resize it to fit the size of the head, and erase the edge with a soft brush:
Add the following Levels adjustment layer as a clipping mask to this flame layer:
Layer:
Mask on this levels adjustment layer:
We can add some more flame texture to the image. Go back to the flame image and select the following portion:
Copy and paste the selection onto our document , move it below the first flame texture, then add the following Levels adjustment layer as a clipping mask:
Erase the edge with a soft eraser, and you will have the following effect:
You can render some more cloud on the flame for more effect:
STEP 5
Now let's create some flame hair strips. Go to the flame texture and select a portion as shown below:
Copy and paste the selection onto our document, bring up the liquify filter and use the following settings:
Use the forward warp tool to warp the flame to form the following shape:
Attach it to the forehead as shown below:
Duplicate this layer a number of times, resize and rotate each duplication and form a group of hair strips:
STEP 6
Now we can make a break-apart brush. Go to the plaster texture and use the quick selection tool to select a small piece:
Go to "Edit > Define Brush Preset" and define a new brush:
Once you define the brush, apply the following brush dynamics to it:
Shape Dynamics
Scattering
Other Dynamics
Tick the "Airbrush","Smoothing" and "Protect Texture" option.
Use this brush as eraser, go back to plaster texture layer and erase the edge with this brush:
Then use the brush to paint around the edge of the face - adjust the size, flow and opacity as you see fit:
STEP 7
We're almost done. For some final retouches, we can flatten the image and duplicate the background layer, then apply the following Reduce Noise Filter to the duplicate layer:
We don't want the whole image to be sharpened, so use a layer mask to hide the outer portion , the flame and the bottom portion. The following screenshot will give you an indication:
As a result, you can see the outer edge of the edge become blurred - this creates more depth for this image and add motion:
If you're happy with your work, you can just leave at that. Alternatively, you can add some more colour to the image to make a bit more vibrant.
There are several methods you can do this:
Colour balance adjustment layer with mask
Paint with a soft brush on a new layer (set blending mode to "overlay","soft light" or "color")
Play with channels
You can experiment with the aboves and see what result that brings you.
I have the following final effect: (click to enlarge)
That's it for this post ! Hope you enjoy this tutorial and find it useful! Till next time, have a great day!.....Don't forget to post your comments below...Thank You....
 09:17
09:17


![CyberLink PowerDirector 13 Ultimate Crack + Setup + Content Packs are Here ! [Updated] 2016 - Azaaditv.blogspot.com](https://blogger.googleusercontent.com/img/b/R29vZ2xl/AVvXsEg3IHiW_M5TjWxB_q7WwfzRySwJBfGIgiuCoXnth3Rrll1jOuoi55Vxog6WuTehlUy2Z0oyMU7R77ZKyPB10uUcsqSa8c3uTDoHGI7kTdLDYUMVhzgCfEyvI4gnYsxRLGSlT0sb69Q7rxaQ/s72-c/ower+director+13+download-+Azaaditv.blogspot+copy.jpg)


Không có nhận xét nào
Đăng nhận xét